SSH Tunneling
SSH Tunneling - Complete Guide
referece: https://iximiuz.com/en/posts/ssh-tunnels/
https://www.ssh.com/academy/ssh/tunneling-example
https://goteleport.com/blog/ssh-tunneling-explained/
Local Port Forwarding
Local Port Forwarding with a Bastion Host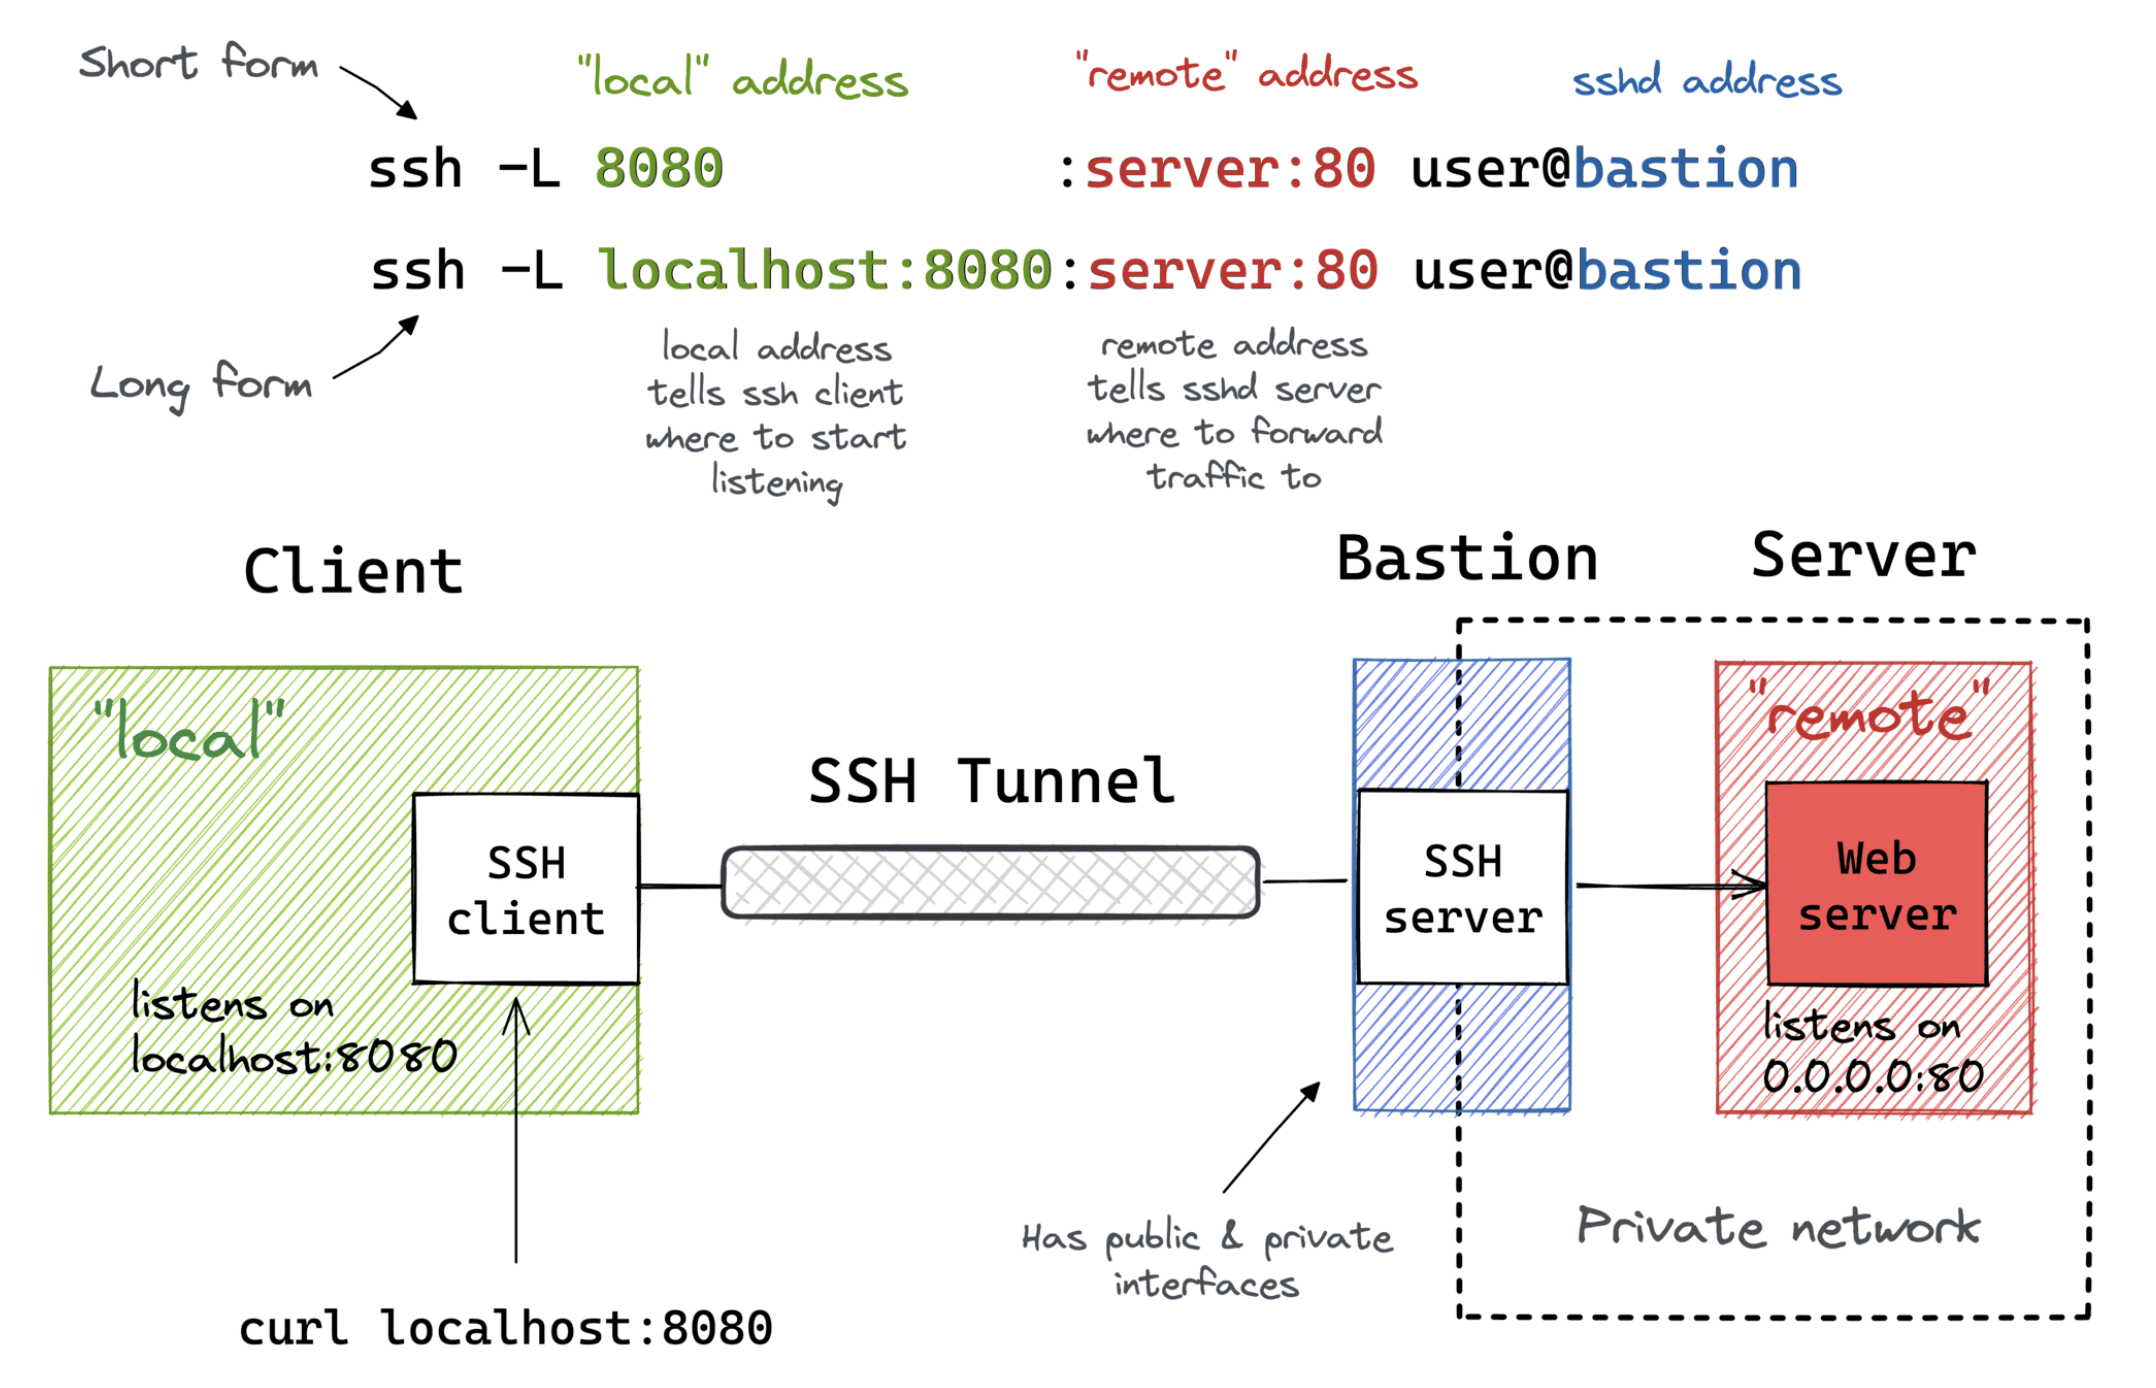
Remote Port Forwarding

Remote Port Forwarding from a Home/Private Network
Overview
SSH Tunneling (Port Forwarding) allows you to create encrypted connections between machines to access services, bypass firewalls, and expose local services securely.
Quick Reference:
- Local (-L): SSH client opens port → forwards to remote
- Remote (-R): SSH server opens port → forwards to local
- Dynamic (-D): SSH client opens SOCKS proxy → dynamic forwarding
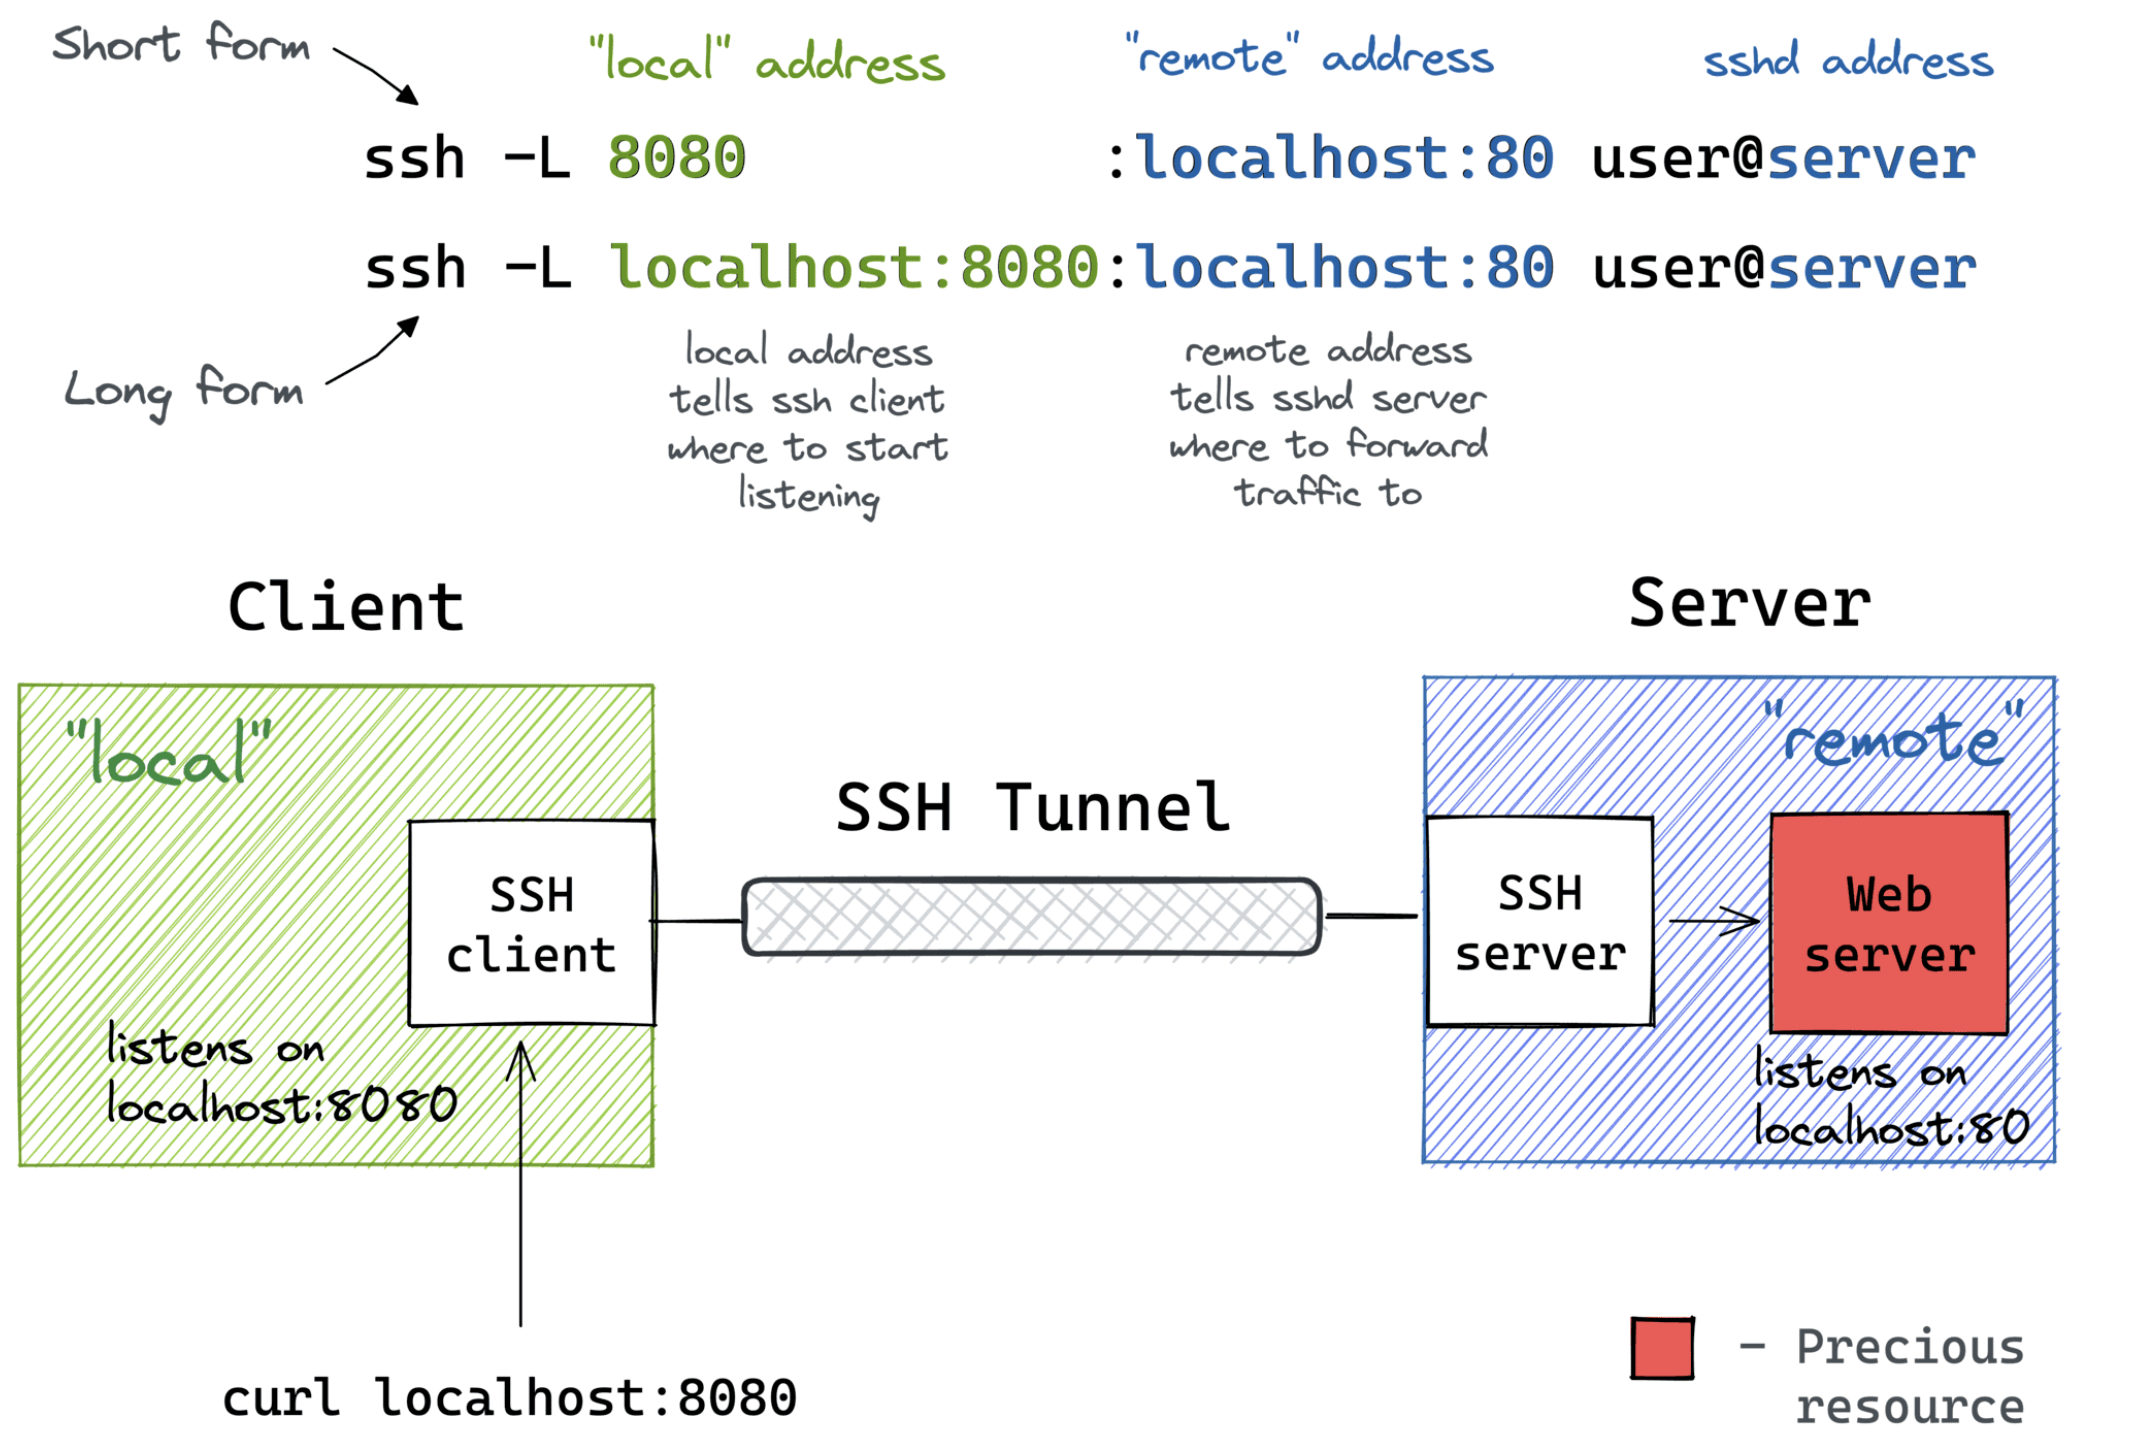
1. Local Port Forwarding (-L)
Purpose: Access a remote service from your local machine
Basic Syntax
ssh -L [local_addr:]local_port:remote_addr:remote_port [user@]sshd_addr
Visual Diagram
┌─────────────┐                    ┌──────────────┐
│ Your Laptop │                    │ SSH Server   │
│             │    SSH Tunnel      │              │
│ localhost:  │◄──────────────────►│ remote_addr: │
│ local_port  │    (encrypted)     │ remote_port  │
└─────────────┘                    └──────────────┘
Examples
Example 1: Access remote MySQL from localhost
ssh -L 3306:localhost:3306 user@remote-server.com
# Now connect to localhost:3306 on your laptop → reaches MySQL on remote server
Example 2: Access service on specific interface
ssh -L 8080:192.168.1.100:80 user@bastion-host.com
# Your localhost:8080 → 192.168.1.100:80 (accessible from bastion)
Example 3: Bind to specific local address
ssh -L 0.0.0.0:8080:localhost:80 user@server.com
# Makes port 8080 accessible on all your network interfaces (not just localhost)
Common Use Cases
- Access database (MySQL, Postgres, Redis) with GUI tools
- Access internal web services via browser
- Connect to services behind firewalls
- Access container ports without publishing them
Flags
-f    # Run in background
-N    # Don't execute remote command (port forwarding only)
-L    # Local port forwarding

# Combined example:
ssh -f -N -L 8080:localhost:80 user@server.com
2. Local Port Forwarding with Bastion Host
Purpose: Access a service on a private network through a jump host
Syntax
ssh -L [local_addr:]local_port:remote_addr:remote_port [user@]bastion_addr
Visual Diagram
┌─────────────┐         ┌─────────────┐         ┌──────────────┐
│ Your Laptop │         │   Bastion   │         │ Private Host │
│             │  SSH    │   (public)  │  Direct │              │
│ localhost:  │◄───────►│             │◄───────►│ remote_addr: │
│ local_port  │ Tunnel  │             │ Access  │ remote_port  │
└─────────────┘         └─────────────┘         └──────────────┘
Examples
Example 1: Access RDS through EC2 bastion
ssh -L 5432:my-rds.abc123.us-east-1.rds.amazonaws.com:5432 ec2-user@bastion.example.com
# localhost:5432 → RDS (only accessible from bastion's VPC)
Example 2: Access private web service
ssh -L 8080:internal-app.private:80 user@bastion.company.com
# localhost:8080 → internal-app.private:80
Use Cases
- Access VPC-internal AWS services (RDS, ElastiCache, OpenSearch)
- Connect to private network resources
- Access dev environments behind corporate firewall
3. Remote Port Forwarding (-R)
Purpose: Expose your local service to a remote server (reverse tunnel)
Basic Syntax
ssh -R [remote_addr:]remote_port:local_addr:local_port [user@]gateway_addr
Visual Diagram
┌─────────────┐                    ┌──────────────┐
│ Your Laptop │                    │ Gateway      │
│             │    SSH Tunnel      │ (public)     │
│ localhost:  │◄──────────────────►│              │
│ local_port  │    (encrypted)     │ remote_addr: │
│             │                    │ remote_port  │◄─── External access
└─────────────┘                    └──────────────┘
Examples
Example 1: Expose local web server
ssh -R 8080:localhost:3000 user@public-server.com
# public-server.com:8080 → your localhost:3000
Example 2: Expose to public interface
ssh -R 0.0.0.0:8080:localhost:3000 user@gateway.com
# Requires: GatewayPorts yes in sshd_config
# Anyone can access gateway.com:8080 → your localhost:3000
Important Configuration
On the SSH server (/etc/ssh/sshd_config):
GatewayPorts yes    # Allow remote_addr to be non-localhost
# Default is 'no' (only localhost on remote server can access the port)
Use Cases
- Demo local development to clients
- Expose local service temporarily
- Webhook testing (e.g., GitHub webhooks to localhost)
- Bypass NAT/firewall for incoming connections
Flags
-f    # Run in background
-N    # Don't execute remote command
-R    # Remote port forwarding

# Combined:
ssh -f -N -R 8080:localhost:3000 user@server.com
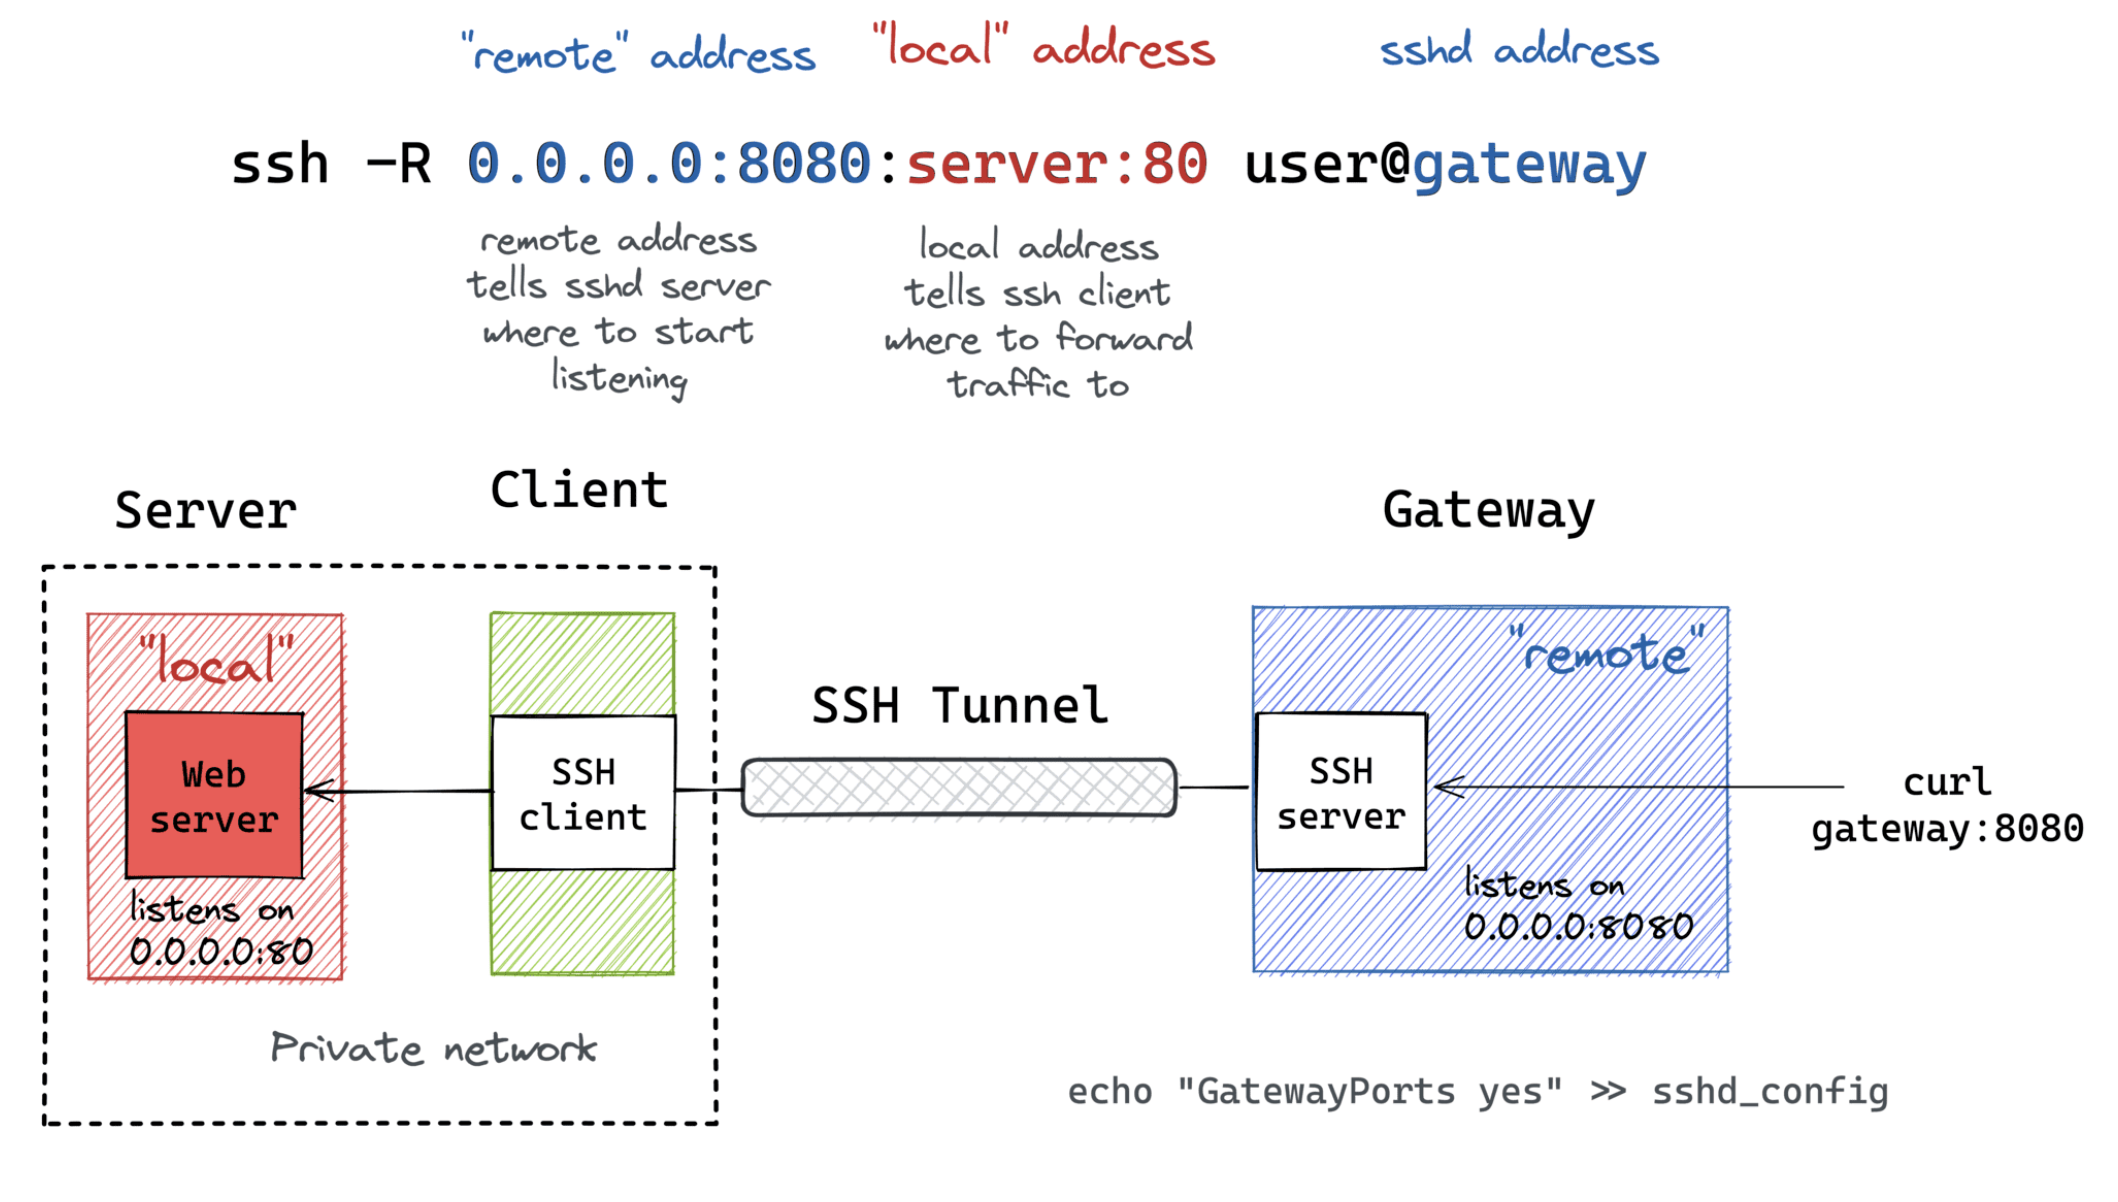
4. Remote Port Forwarding from Private Network
Purpose: Expose a service from your home/private network to the internet
Syntax
ssh -R [remote_addr:]remote_port:local_addr:local_port [user@]gateway_addr
Visual Diagram
┌─────────────┐         ┌─────────────┐         ┌──────────────┐
│   Gateway   │         │ Your Laptop │         │  Home Server │
│  (public)   │  SSH    │   (bastion) │  LAN    │              │
│             │◄───────►│             │◄───────►│ local_addr:  │
│ remote_addr:│ Tunnel  │             │ Access  │ local_port   │
│ remote_port │         │             │         │              │
└─────────────┘         └─────────────┘         └──────────────┘
       ▲
       │ External users can access
Example
# From your laptop:
ssh -R 8080:home-server.local:3000 user@public-gateway.com
# public-gateway.com:8080 → home-server.local:3000
Use Cases
- Expose home server services without opening router ports
- Access IoT devices from anywhere
- Share local network resources temporarily
5. Dynamic Port Forwarding (-D) - SOCKS Proxy
Purpose: Create a SOCKS proxy for dynamic forwarding of multiple connections
Syntax
ssh -D [local_addr:]local_port [user@]sshd_addr
Visual Diagram
┌─────────────┐                    ┌──────────────┐
│ Your Laptop │                    │  SSH Server  │
│             │    SSH Tunnel      │              │
│ SOCKS Proxy │◄──────────────────►│              │
│ localhost:  │    (encrypted)     │    ┌────┐    │
│ local_port  │                    │───►│Web │    │
│             │                    │    └────┘    │
│ Browser ────┤                    │    ┌────┐    │
│ App ────────┤                    │───►│ DB │    │
└─────────────┘                    │    └────┘    │
                                   └──────────────┘
Examples
Example 1: Basic SOCKS proxy
ssh -D 1080 user@remote-server.com
# Configure browser/app to use SOCKS5 proxy: localhost:1080
Example 2: Background SOCKS proxy
ssh -f -N -D 1080 user@server.com
Browser Configuration
Firefox
- Settings → Network Settings → Manual proxy configuration
- SOCKS Host:
localhost, Port:1080 - Select "SOCKS v5"
- Check "Proxy DNS when using SOCKS v5"
Or use FoxyProxy extension for easy switching:
1. Install FoxyProxy Standard
2. Add proxy: SOCKS5, localhost:1080
3. Create patterns (e.g., *.internal.company.com)
4. Toggle on/off from toolbar
Chrome/Chromium
# Launch with SOCKS proxy
google-chrome --proxy-server="socks5://localhost:1080"

# Or use SwitchyOmega extension
# Install → Configure → New Profile → Protocol: SOCKS5
System-wide (Linux)
export ALL_PROXY=socks5://localhost:1080

# For GUI apps (add to ~/.bashrc or /etc/environment)
export HTTP_PROXY=socks5://localhost:1080
export HTTPS_PROXY=socks5://localhost:1080
export NO_PROXY=localhost,127.0.0.1
macOS System-wide
# Network Preferences → Advanced → Proxies
# Check "SOCKS Proxy"
# Server: localhost:1080

# Or via command line:
networksetup -setsocksfirewallproxy "Wi-Fi" localhost 1080
Use Cases
- Browse the internet through remote server
- Access multiple remote services without multiple tunnels
- Bypass geo-restrictions
- Secure browsing on untrusted networks
- Access entire remote network
Tools that support SOCKS
# curl
curl --socks5 localhost:1080 http://example.com

# git
git config --global http.proxy socks5://localhost:1080

# wget
wget -e use_proxy=yes -e http_proxy=localhost:1080 http://example.com
6. X11 Forwarding (-X / -Y)
Purpose: Run graphical applications on a remote server with display on your local machine
Syntax
ssh -X [user@]server.com              # Basic X11 forwarding
ssh -Y [user@]server.com              # Trusted X11 forwarding (less secure)
Visual Diagram
┌─────────────┐                    ┌──────────────┐
│ Your Laptop │                    │ SSH Server   │
│             │    SSH Tunnel      │              │
│   X Server  │◄──────────────────►│ GUI App      │
│  (Display)  │    (encrypted)     │ (xclock,     │
│             │                    │  firefox)    │
└─────────────┘                    └──────────────┘
Examples
Example 1: Run remote GUI application
ssh -X user@server.com
# On remote server:
firefox &
gedit document.txt &
xclock &
Example 2: Single command execution
ssh -X user@server.com "gedit /etc/hosts"
# Opens gedit on your local display, editing remote file
Example 3: With compression for slow connections
ssh -XC user@server.com
# -C enables compression, helpful over slow links
Difference between -X and -Y
-X: Enables X11 forwarding with X11 SECURITY extension controls (safer)-Y: Enables trusted X11 forwarding (bypasses X11 SECURITY, needed for some apps)
Requirements
On your local machine (client):
- X Server running (Linux/macOS/Windows with X server like VcXsrv/Xming)
On remote server (/etc/ssh/sshd_config):
X11Forwarding yes
X11DisplayOffset 10
X11UseLocalhost yes
macOS X11 Setup
# Install XQuartz
brew install --cask xquartz

# Start XQuartz and enable "Allow connections from network clients"
# Then SSH with -X flag
ssh -X user@server.com
Windows X11 Setup
# Install VcXsrv or Xming
# Start X server, then use PuTTY or WSL2:
ssh -X user@server.com
Common Use Cases
- Run remote IDE or text editor (VS Code, PyCharm, gedit)
- View remote images/PDFs with GUI viewers
- Run database management GUIs (MySQL Workbench, pgAdmin)
- Run remote browser for testing
Troubleshooting X11
# Check DISPLAY variable is set
echo $DISPLAY
# Should show something like: localhost:10.0

# Test X11 with simple app
xclock
xeyes

# Debug X11 forwarding
ssh -v -X user@server.com
# Look for "Requesting X11 forwarding" in output
7. Multiple Port Forwards
You can create multiple tunnels in one SSH session:
ssh -L 3306:localhost:3306 \
    -L 6379:localhost:6379 \
    -L 8080:internal-app:80 \
    user@server.com
8. Reverse Dynamic Forwarding (-R + SOCKS)
Purpose: Allow remote server to use your local machine as SOCKS proxy
Syntax
ssh -R remote_port user@server.com
# Requires OpenSSH 7.6+
Example
ssh -R 1080 user@remote-server.com
# Remote server can now use localhost:1080 as SOCKS proxy to access your network
9. ProxyJump / Jump Host
Purpose: Chain SSH connections through intermediate hosts
Modern Syntax (OpenSSH 7.3+)
ssh -J jump-host.com user@final-destination.com

# Multiple jumps:
ssh -J jump1.com,jump2.com user@final.com

# With port forwarding:
ssh -J bastion.com -L 8080:localhost:80 user@private-server
Legacy Syntax
ssh -o ProxyCommand="ssh -W %h:%p user@jump-host.com" user@final-destination.com
Config File (~/.ssh/config)
Host private-server
    HostName 10.0.1.100
    User admin
    ProxyJump bastion.example.com

Host bastion.example.com
    User ec2-user
    IdentityFile ~/.ssh/bastion-key.pem
10. Summary & Mnemonics
Quick Reference Table
| Type | Flag | Syntax | Opens Port On | Use Case |
|---|---|---|---|---|
| Local | -L |
local:remote |
SSH Client | Access remote service locally |
| Remote | -R |
remote:local |
SSH Server | Expose local service remotely |
| Dynamic | -D |
local_port |
SSH Client | SOCKS proxy for multiple services |
| X11 | -X/-Y |
N/A | SSH Client | Run remote GUI apps locally |
| ProxyJump | -J |
jump_host |
N/A | Chain SSH through intermediaries |
Mnemonics
-L= Local opens port, Listen locally-R= Remote opens port, Reverse direction-D= Dynamic SOCKS proxy- Left side opens port:
-L local:remote(local opens),-R remote:local(remote opens)
Port Format
-L [bind_address:]port:host:hostport
-R [bind_address:]port:host:hostport
-D [bind_address:]port

bind_address:
  - localhost (default) - only local access
  - 0.0.0.0 - all interfaces (requires GatewayPorts for -R)
  - specific IP - bind to specific interface
11. Common Flags Reference
-f    # Fork to background after authentication
-N    # Don't execute remote command (port forwarding only)
-C    # Enable compression
-v    # Verbose (debugging)
-vv   # More verbose
-vvv  # Maximum verbosity

-g    # Allow remote hosts to connect to local forwarded ports
      # (Alternative to binding to 0.0.0.0)

-n    # Redirect stdin from /dev/null (useful with -f)
-T    # Disable pseudo-terminal allocation
-q    # Quiet mode
-4    # Force IPv4
-6    # Force IPv6

-o ServerAliveInterval=60  # Keep connection alive
-o ServerAliveCountMax=3   # Max keepalive retries
Useful Combinations
Background tunnel with keepalive
ssh -f -N -o ServerAliveInterval=60 -L 8080:localhost:80 user@server.com
Verbose debugging
ssh -vvv -L 8080:localhost:80 user@server.com
Compressed tunnel
ssh -C -L 8080:localhost:80 user@server.com
12. Advanced Techniques
AutoSSH - Auto-restart tunnels
# Install autossh
sudo apt install autossh

# Auto-restart if connection dies
autossh -M 0 -f -N -L 8080:localhost:80 user@server.com
Persistent Tunnels with systemd
# /etc/systemd/system/ssh-tunnel.service
[Unit]
Description=SSH Tunnel to Remote Server
After=network.target

[Service]
Type=simple
User=youruser
ExecStart=/usr/bin/ssh -N -L 8080:localhost:80 user@server.com
Restart=always
RestartSec=10

[Install]
WantedBy=multi-user.target
sudo systemctl enable ssh-tunnel
sudo systemctl start ssh-tunnel
SSH Config for Persistent Tunnels
# ~/.ssh/config
Host tunnel-db
    HostName bastion.example.com
    User admin
    LocalForward 3306 rds-instance.internal:3306
    LocalForward 6379 redis.internal:6379
    ServerAliveInterval 60
    ServerAliveCountMax 3
    IdentityFile ~/.ssh/bastion-key.pem

# Usage: ssh -N tunnel-db
SSH Escape Sequences - Interactive Tunnel Management
SSH escape sequences allow you to control active SSH sessions interactively.
Common Escape Sequences
~?      # Show all escape sequences
~C      # Open SSH command line (add/remove port forwards on the fly)
~.      # Terminate connection
~&      # Background SSH (when waiting for forwarded connections)
~#      # List forwarded connections
Adding Tunnels to Running Session
# 1. Press Enter, then ~C (tilde + Shift + C)
# 2. You'll see: ssh>
# 3. Add port forward:
ssh> -L 8080:localhost:80
ssh> -R 9090:localhost:3000
ssh> -D 1080

# 4. Press Enter to return to session
Example Session
$ ssh user@server.com
# ... working on server ...
# Need to add a port forward without reconnecting:
[Enter]
~C
ssh> -L 3306:localhost:3306
Forwarding port.
# Continue working with new tunnel active
Enable Escape Character (if disabled)
# In ~/.ssh/config
Host *
    EscapeChar ~

# Or on command line:
ssh -e ~ user@server.com
ControlMaster - Connection Multiplexing
Purpose: Reuse a single SSH connection for multiple sessions (faster, fewer authentication prompts)
Configuration (~/.ssh/config)
Host *
    ControlMaster auto
    ControlPath ~/.ssh/control-%r@%h:%p
    ControlPersist 10m
What it does:
- ControlMaster auto: First connection becomes master, subsequent ones are slaves
- ControlPath: Socket location for connection sharing
- ControlPersist 10m: Keep master connection alive for 10 minutes after last session
Benefits
# First connection (creates master):
ssh user@server.com
# Takes 2 seconds (authentication)

# Second connection (reuses master):
ssh user@server.com
# Instant! No authentication needed

# SCP also benefits:
scp file.txt user@server.com:/tmp/
# Instant connection reuse
Manual Control
# Check master connection status
ssh -O check user@server.com

# Stop master connection
ssh -O stop user@server.com

# Forward master to background
ssh -O forward user@server.com
Per-Host Configuration
# ~/.ssh/config
Host bastion
    HostName bastion.example.com
    User admin
    ControlMaster auto
    ControlPath ~/.ssh/control-%r@%h:%p
    ControlPersist 1h

Host production-*
    ProxyJump bastion
    ControlMaster auto
    ControlPath ~/.ssh/control-%r@%h:%p
    ControlPersist 30m
Use Case Example
# Terminal 1: Create master connection with tunnel
ssh -fN -L 3306:localhost:3306 user@server.com

# Terminal 2: Regular SSH (reuses connection, no new auth)
ssh user@server.com

# Terminal 3: SCP (reuses connection)
scp file.txt user@server.com:/tmp/

# All three use the same underlying TCP connection!
13. Security Considerations
Server Configuration (/etc/ssh/sshd_config)
# Allow TCP forwarding (default: yes)
AllowTcpForwarding yes

# Allow remote port forwarding to bind to non-localhost
GatewayPorts yes           # Allow any interface
# GatewayPorts clientspecified  # Client specifies interface

# Allow agent forwarding (use cautiously)
AllowAgentForwarding yes

# Restrict forwarding to specific users
Match User tunnel-user
    AllowTcpForwarding yes
    GatewayPorts yes
Match User *
    AllowTcpForwarding no
Restricting Tunnel Destinations with PermitOpen
Purpose: Limit which destinations can be forwarded to (whitelist approach)
Server Configuration (/etc/ssh/sshd_config)
# Restrict all users by default
Match User *
    AllowTcpForwarding yes
    PermitOpen localhost:3306 localhost:6379 192.168.1.100:80
    # Only these destinations can be forwarded to

# Or per-user restrictions
Match User tunnel-user
    AllowTcpForwarding yes
    PermitOpen localhost:3306
    PermitListen localhost:8080
    # tunnel-user can only forward to MySQL and listen on 8080

Match User developer
    AllowTcpForwarding yes
    PermitOpen 10.0.0.0/8:*
    # developer can forward to any port on 10.0.0.0/8 network
PermitListen (for Remote Port Forwarding)
Match User web-developer
    AllowTcpForwarding remote
    PermitListen localhost:8080 localhost:8443
    # Can only create remote forwards on these ports
Disable Specific Forwarding Types
# Allow only local forwarding (no remote)
AllowTcpForwarding local

# Allow only remote forwarding (no local)
AllowTcpForwarding remote

# Allow neither
AllowTcpForwarding no
Best Practices
- Use key-based authentication (not passwords)
- Limit GatewayPorts - only enable if needed
- Restrict tunnel users - create dedicated tunnel users with limited permissions
- Use PermitOpen - whitelist allowed destinations
- Monitor connections - check active tunnels with
ss -tlnp | grep ssh - Use firewall rules - restrict access to forwarded ports
- Avoid agent forwarding in untrusted environments
- Use dedicated keys for tunnels (not your main SSH key)
- Set PermitListen - restrict which ports can be used for remote forwarding
- Audit tunnel usage - log and review SSH tunnel activity
SSH Tunnel Logging
# /etc/ssh/sshd_config
LogLevel VERBOSE
# Logs port forwarding requests in /var/log/auth.log

# Monitor in real-time
sudo tail -f /var/log/auth.log | grep -i forward
14. Monitoring Active SSH Tunnels
Check Active Tunnels
List all SSH connections and port forwards
# Show listening ports by SSH
ss -tlnp | grep ssh
netstat -tlnp | grep ssh

# Show established SSH connections
ss -tnp | grep ssh

# Show SSH processes with full command
ps aux | grep ssh | grep -v grep

# Detailed view with lsof
sudo lsof -i -n | grep ssh
Example Output Analysis
$ ss -tlnp | grep ssh
LISTEN 0  128  127.0.0.1:8080  0.0.0.0:*  users:(("ssh",pid=12345,fd=4))
LISTEN 0  128  127.0.0.1:3306  0.0.0.0:*  users:(("ssh",pid=12345,fd=5))
# SSH process 12345 has two local forwards: 8080 and 3306
Monitor Tunnel Health
Simple monitoring script
#!/bin/bash
# check-tunnel.sh

TUNNEL_PID=$(pgrep -f "ssh.*-L.*8080")

if [ -z "$TUNNEL_PID" ]; then
    echo "Tunnel is DOWN"
    # Optionally restart
    ssh -fN -L 8080:localhost:80 user@server.com
else
    echo "Tunnel is UP (PID: $TUNNEL_PID)"
fi
Check if tunnel port is accessible
# Test local forwarded port
nc -zv localhost 8080
# Or
curl -v localhost:8080

# Test with timeout
timeout 5 bash -c 'cat < /dev/null > /dev/tcp/localhost/8080'
echo $?  # 0 = success, 124 = timeout
Kill Specific Tunnels
# Kill tunnel on specific port
lsof -ti:8080 | xargs kill

# Kill all SSH tunnels for specific user
pkill -u $USER ssh

# Kill specific SSH session by PID
kill 12345

# Force kill if needed
kill -9 12345
Systemd Service with Health Check
# /etc/systemd/system/ssh-tunnel-monitored.service
[Unit]
Description=SSH Tunnel with Health Monitoring
After=network.target

[Service]
Type=simple
User=youruser
ExecStart=/usr/bin/ssh -N -L 8080:localhost:80 user@server.com
Restart=always
RestartSec=10
StartLimitBurst=5
StartLimitIntervalSec=60

# Health check
ExecStartPost=/bin/sleep 5
ExecStartPost=/bin/sh -c 'nc -zv localhost 8080'

[Install]
WantedBy=multi-user.target
15. Troubleshooting
Check if tunnel is active
# List listening ports
ss -tlnp | grep ssh
netstat -tlnp | grep ssh

# Check SSH connection
ps aux | grep ssh

# Verbose SSH for debugging
ssh -vvv -L 8080:localhost:80 user@server.com
Common Issues
"bind: Address already in use"
# Port already in use, find and kill process
lsof -ti:8080 | xargs kill -9

# Or use different port
ssh -L 8081:localhost:80 user@server.com
"Permission denied" on privileged ports (<1024)
# Use unprivileged port instead
ssh -L 8080:localhost:80 user@server.com  # Instead of port 80

# Or use sudo (not recommended)
sudo ssh -L 80:localhost:80 user@server.com
Remote forwarding not accessible externally
# Check sshd_config on server
grep GatewayPorts /etc/ssh/sshd_config

# Must be: GatewayPorts yes
# Then: sudo systemctl restart sshd
Connection drops/timeouts
# Add keepalive
ssh -o ServerAliveInterval=60 -o ServerAliveCountMax=3 -L 8080:localhost:80 user@server.com

# Or in ~/.ssh/config:
Host *
    ServerAliveInterval 60
    ServerAliveCountMax 3
16. Practical Examples
Example 1: Access AWS RDS
ssh -i ~/.ssh/bastion-key.pem -L 5432:mydb.abc123.us-east-1.rds.amazonaws.com:5432 ec2-user@bastion-public-ip

# Connect with psql:
psql -h localhost -p 5432 -U dbuser -d mydb
Example 2: Webhook Testing (Expose localhost)
# On public server, enable GatewayPorts
ssh -R 0.0.0.0:8080:localhost:3000 user@public-server.com

# GitHub webhook URL: http://public-server.com:8080/webhook
Example 3: Browse Through Remote Server
ssh -D 1080 user@remote-server.com

# Configure browser to use SOCKS5 proxy: localhost:1080
# All traffic now goes through remote server
Example 4: Access Home Server from Anywhere
# From laptop at work:
ssh -L 8080:homeserver.local:80 user@home-router-public-ip

# Or reverse tunnel from home:
# On home server:
ssh -R 8080:localhost:80 user@public-vps.com
# Access from anywhere: http://public-vps.com:8080
Example 5: Chain Multiple Jumps
# Access private database through two jump hosts
ssh -J jump1.com,jump2.com -L 3306:db.private:3306 user@bastion.private

# Or in ~/.ssh/config:
Host db-tunnel
    HostName bastion.private
    User user
    ProxyJump jump1.com,jump2.com
    LocalForward 3306 db.private:3306
17. Alternative Tools & Enhancements
SOCKS Proxy Browser Extensions
FoxyProxy (Firefox/Chrome)
- Easy switching between proxy profiles
- Pattern-based proxy selection
- Useful for selective tunneling
# Setup:
1. Install FoxyProxy extension
2. Add new proxy:
   - Type: SOCKS5
   - Host: localhost
   - Port: 1080
3. Create patterns for specific domains
4. Quick toggle in toolbar
SwitchyOmega (Chrome)
- Similar to FoxyProxy
- Auto-switch based on URL patterns
- Profile-based management
sshuttle - VPN over SSH
Purpose: Poor man's VPN - route traffic through SSH without SOCKS configuration
Installation
# Linux
sudo apt install sshuttle

# macOS
brew install sshuttle

# Python pip
pip install sshuttle
Basic Usage
# Route all traffic through SSH server
sshuttle -r user@server.com 0.0.0.0/0

# Route specific subnet
sshuttle -r user@server.com 10.0.0.0/8

# Route multiple subnets
sshuttle -r user@server.com 10.0.0.0/8 192.168.0.0/16

# Exclude certain IPs
sshuttle -r user@server.com 0.0.0.0/0 -x 192.168.1.0/24

# Include DNS
sshuttle --dns -r user@server.com 0.0.0.0/0
Advantages over SSH -D
- No need to configure applications
- System-wide routing (transparent)
- Handles DNS automatically
- Works with apps that don't support SOCKS
Example: Access entire AWS VPC
# Route all VPC traffic through bastion
sshuttle -r ec2-user@bastion-ip 10.0.0.0/16 --dns

# Now access any VPC resource directly:
curl http://internal-elb.vpc.internal
psql -h rds-instance.vpc.internal
Commercial Alternatives
-
Ngrok: Expose local servers to internet (commercial, free tier available)
ngrok http 3000 # Gives you https://random-id.ngrok.io → localhost:3000 -
Cloudflare Tunnel: Secure tunnels without opening ports
cloudflared tunnel --url localhost:3000 -
Tailscale: Zero-config VPN based on WireGuard
- Peer-to-peer mesh network
- No central gateway needed
- Great for accessing home network from anywhere
-
WireGuard: Modern VPN alternative
- Faster than SSH tunnels for heavy traffic
- Always-on VPN use cases
- Lower overhead than OpenVPN
Other SSH Tools
-
Mosh: Mobile Shell - survives connection drops
mosh user@server.com # Better than SSH for unstable connections -
Eternal Terminal: Persistent SSH sessions
et user@server.com # Auto-reconnects, maintains session state -
Teleconsole: Share terminal sessions
teleconsole
# Gives shareable URL for terminal access
References
- SSH Port Forwarding Explained (Teleport)
- SSH Academy - SSH Tunneling
- OpenSSH Manual
- Visual Guide to SSH Tunnels (iximiuz.com)
Tags: #ssh #networking #tunneling #port-forwarding #socks #proxy #security